| Interior
Tutorial |
|
| Basic Interior Creation From Finished Body Model This is a basic tutorial to get you started in making an interior. All of my locos and rollingstock have some type of interior associated with them. This really adds to the Trainz experience in that it allows you to “ride” on the cars like a brakeman. Some creators can get away with using the Auran default cab interiors for their locos. However, since most of my work resembles nothing remotely close to what Auran provides, I have to make all the loco interiors from scratch which are needed in order to drive in cab mode. This tutorial will provide some basic info on making the interior mesh portion of your model. Interior views are made with two separate models. The main body mesh and the interior mesh. The attachment "a.cabfront" is used in both mesh models to index them to each other. In the examples below, we start with a completed body model. The interior model is created from the main body model by modifying and re-alignment. Finally, the interior model is stripped of mesh items that will not be seen. The steps below illustrate how this is done. NOTE: You must have a basic understanding of the Auran provided Content Creation Guide. |
|
| Image |
|
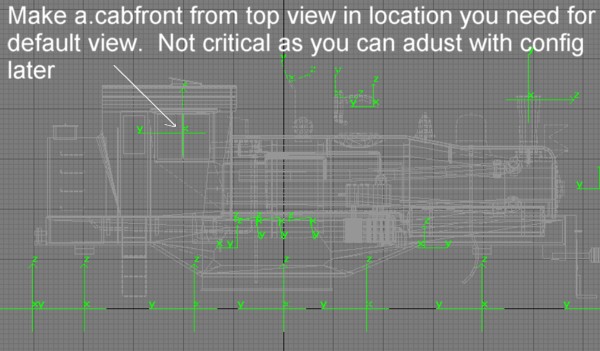 |
The image shows a completed locomotive main body mesh from the side. This is the starting point for your interior. The attachment "a.cabfront" is required to align the interior model with the main body for internal camera views and must be present in both main and interior models. The attachment is placed in top view at the general centered location of the cab with the "Y" axis facing aft. If you are making a dual cab, the "Y" axis of a.cabfront and a.cabback attachments should always point away from the intended direction of view. If the original model did not have the "a.cabfront" attachment to begin with, it must now be saved and exported into Trainz again. |
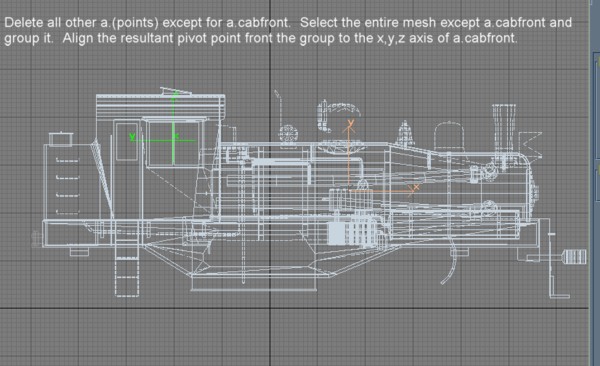 |
The next step is to select all other attachments on the body and delete them. Remeber, this is going to be a new model and will be independant of the original body model. It would be a good idea now to save the interior model as a separate file. After saving the new file, delete all the other attachments as shown leaving only the "a.cabfront" attachment. Then select the entire mesh, excluding the a.cabfront, and "group" it. Align the group pivot point with the a.cabfront attachment. (Note: If you are at this level of modeling, you should know how to align pivots.) |
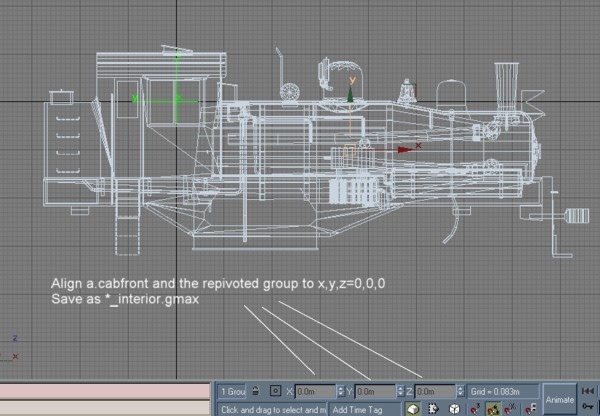 |
Now the model must be aligned with World 0,0,0. Simply select the grouped mesh and right click the x,y.z alignment spinners. Do the same with the a.cabfront attachment. This is the final alignment process and sets up the interior model to align itself in the position of the main body model's a.cabfront attachment. This is so that when you look out of the interior, you are at the correct level. If this step is not done properly you will know later when it is exported. You may be looking straight up/down sideways or underground! If that happens, repeat these steps and double check your alignment and orientation of the a.cabfront pivots. |
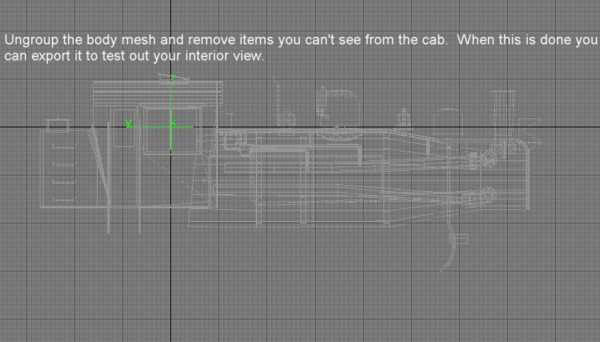 |
Not that now the interior body and the a.cabfront pivot are aligned with world 0,0,0. You can now ungroup the mesh and begin removing parts you will not be able to see from within the cab. You can even go as far as simplifying some of the external parts further to reduce polygons if required. A goal of 10,000 polys or less for a complete interior model is reasonable. Once you are done removing parts, export the model to Trainz in accordance with the Content Creation Guide. Make a config file and go test it now.
|
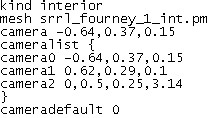 |
If the interior works and you will know if it doesn't, you can adjust the camera viewpoints inside the cab by adding some lines to the config. The Content Creation Guide explains how this is accomplished. |
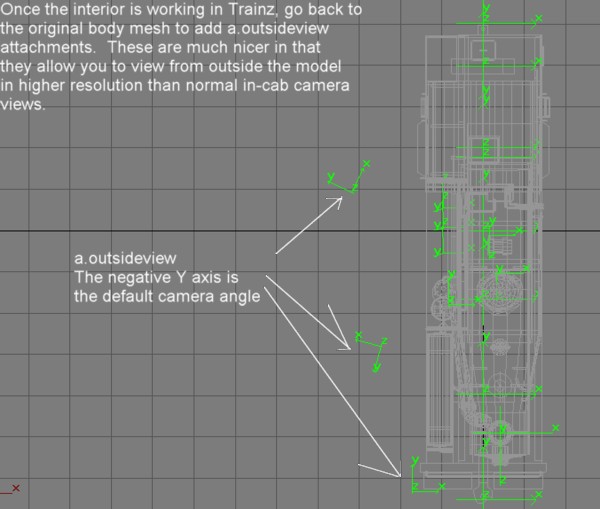 |
Once the interior is working and you are satisfied with your interior cameras, you can add outsideview attachments to the original body mesh for additional viewing effects. This is what you should use for "brakeman" views and any other external views. Study the image to see how the attachments can be used. The main body model must be re-exported for these to take effect. No other modification to the config is required.
|