VANAGON RETRO H4 LIGHT UPGRADE
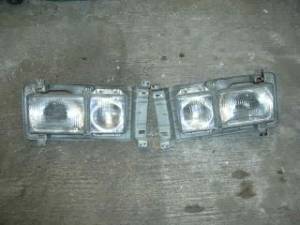
Figure 1 square lights where they belong...REMOVED
The 86-91 Vanagons come stock with the square light assemblies which are poor at best. I have experienced great fear of the unknown when driving at night with these less than adequate globes. The stock Vanagon lights are like two candles in a fish aquarium. I tried the standard relay system installation and the lights were improved drastically as expected, however they were still not up to standards and are pitifully poor when compared to my 88 GTi with 80/100W E-code H4 lights or any other modern European vehicle for that matter.
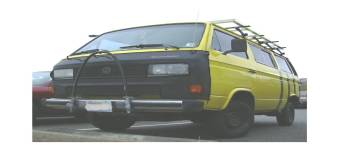
Figure 2 square lights are cool until you need to turn them ON
Some options exist to upgrade the lights. One is to obtain the E-code light assemblies that came stock on Vanagons in Europe. Another is the ProjectZwo grille and 200mm H4 light modification. These are great bolt-in options, however at over $550 for a set this is a rather expensive option.

Figure 3 Wanderwagon sporting new H4 rounds
My objective was to get as much QUALITY light on the road for the least amount of money. So I simply went RETRO. The older vanagons use round 7” globes which are very common in the H4 variety. Going with the old style grille and round 7” H4s is a monstrous improvement over the stock system and the project was kept well under $150. Very cost effective upgrade I’d say.
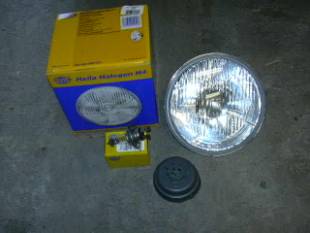
Figure 4 Hella H4 E-code 7" light assembly
Here is a list of materials and approx. costs:
|
Item |
Source |
Qty |
Cost |
|
7” round H4 Hella with 100/55 bulbs |
1pr |
$76 |
|
|
Bosch style 30A 12v relay |
Parts Express p/n 330-070 |
4 |
$8 |
|
10ga and 12ga wire |
Various FLAPS |
30ft |
$6 |
|
¼ blade connectors |
Various FLAPS |
16 |
$2 |
|
Terminal lugs |
Various FLAPS |
4 |
$1 |
|
H4 Connectors |
Various FLAPS |
2 |
$2 |
|
80-85 Round light grille |
Your source |
1 |
$20 |
|
80-85 Round light bucket assemblies |
Your source |
1set |
$20 |
|
|
|
TOTAL |
$135 |
This stuff may cost more or less depending on your sources.
This mod is very simple as the retro fitting of the old grille and light assemblies bolt right in. All the mounting hardware and holes are already there. The most technical part will be to install the relays which are a must if you want this upgrade to be anything worthwhile. Fortunately, my van already had relays in it, (from previously trying to improve the stock lights) so all I had to do was change to H4 connectors and I was done!
For those who do not have relays and would like to upgrade everything, here are the basic procedures:
RELAY INSTALLATION
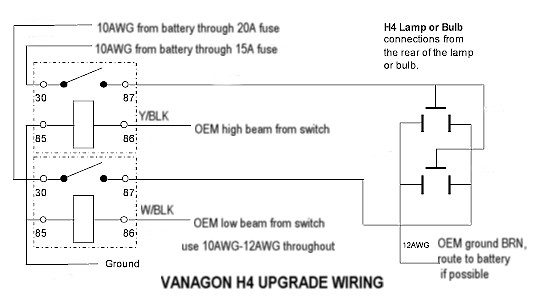
Why are these relays important? Well, if you want to keep your lights in working order, you HAVE to do this. Without getting into electronic formulas, you can think of the power requirements of the lights as a water hose. Your battery/alternator is the source. If you use small wires to the switch (as stock) and then to the lights (as stock) you are looking at about 20 feet or more of 14AWG wire. Like hooking up a 1/8 inch vacuum hose to your water faucet and expecting to wash the dirty Vanagon with it. Not gonna get much water out of that puny hose. Add to the fact that the switch is trying to route ALL the power through it and you are headed for disaster, i.e. melted switch. With the relays, you eliminate the requirement for the switch to power the beams. The relays do all the work for you. If you use adequate wiring 10AWG-12AWG then your problems are solved. No melted switch, super efficient bright beams.
The first thing you need is a Bentley manual. Specifically the wiring diagrams contained within. You CAN do this without a Bentley but you need one anyway for other stuff so just get one. Refer to page 97.211 and 97.212 and you will find the light switch and lamp assemblies. To install the relays, you will use the existing wiring to switch them on. Basically you will cut the wiring to the lamps and use that to power your relays. The relays route power to the lamps directly from the battery eliminating your lame light switch, which WILL melt with high-powered bulbs. Power and ground wiring for the lamps will be added directly to the battery by you. Go to Susquehanna motor sports or Daniel Stern lighting to learn about relay upgrades. See schematic:
Get the grille off and the headlight assemblies.
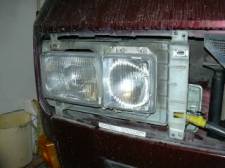
Figure 5 light assembly
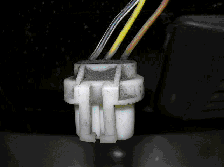
Figure 6 9004 connector
This
connector needs to be removed from the left and right sides. Mark the wiring according to the Bentley or
refer to the following table:
|
Right side Low Beam |
Yellow |
|
Right side High Beam |
White |
|
Right side Ground |
Brown |
|
Left side Low Beam |
Yellow/Blk stripe |
|
Left side High Beam |
White/Blk stripe |
|
Left side Ground |
Brown |
The connectors for the driving lights should be filled with dielectric grease, taped and stowed. You may want to use them later as in a South African Grille or other aftermarket driving light installation.
The pass side light
area has a nice cavity to mount the relays.
I used a plastic food container to protect the relays from the weather. The fat yellow wires above the relay box are
the power wires going to the battery.
Holes were drilled through the sheet metal and the wires with grommets
ran through. The wires enter the
cockpit behind the glove box and are routed under the floor sound deadening
material, under the pass seat to a fused power distribution block in the
battery compartment. You could also
route wires directly off the battery terminals through in- line fuses.
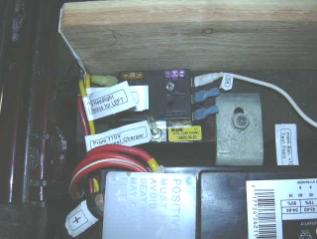
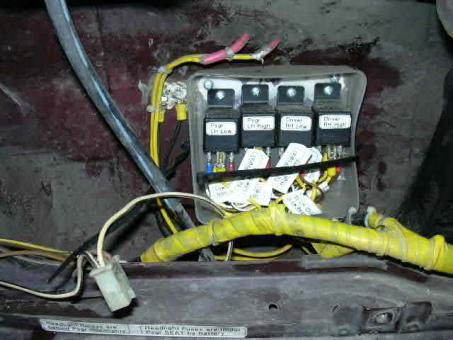
Figure 7 Relay box detail. 10AWG power wires enter cavity from above relay box. The zip tie on the box holds the lid on. Silicone sealant was used on the screw holes to prevent moisture intrusion and corrosion. Solder all connectors.
Once you have power on the relays you can hook up some grounds. The best is to go directly to the battery, but on the Vanagon this is somewhat difficult so I just drilled a hole in the body sheetmetal near the relays and put a terminal screw there. Made one of these ground screws for each side.
The original lighting wires will now be used to control the relays (see schematic and OEM wires). They come directly from the light switch. You only need the passenger side wires for the relays as you will be routing new wires from the relays to the lights. The OEM driver’s side connector and wires can be cut and stowed. I used heat shrink on the wires for end cap terminals on the driver’s side. Hook up everything according to the schematic.
The last item is to route new wires from the relays to the lights themselves. Again, see schematic which also identifies the H4 connector pin locations. Use at least 12-14AWG wire to the lights. I made a conduit to run across the horizontal beam in front of the radiator to the driver’s side light. All connections were crimped and soldered. Weather proofing with tape and dielectric grease is paramount to ensuring good connections for years to come.
Finish with the installation of the lights and bulbs being extra careful not to touch the bulbs when installing into the lens assemblies. The grille is a direct installation but may require slight Dremel tool modification on the structural ribs behind to clear the original mounting tabs for the square light assemblies. Not a big deal. Aim lights according to the instructions on the Daniel Stern site and you are done! Fantastic lighting at a fraction of the cost of commercial upgrades.